Pages

Showing posts with label Refurbished and Fabulous. Show all posts

Friday, April 12, 2013

Updating a Brand New Storage Cabinet

For those of you with kids, you know how their toys get out of control and take over your house.  Downstairs we turned E's old room into her playroom and keep the big toys there and then upstairs she has her room full of toys and in the bonus room we have an Ikea storage center with bins full of stuff.  In our den we had a little chest I got at Hobby Lobby when she was a baby that is about 2 feet wide by 1 foot high and deep.  That no longer contain hurricane Evelyn.  So Joe and I came to terms that we needed to invest in another piece of furniture for the den. 

Luckily, Northwest Arkansas got a Home Goods!  Imagine my excitement.  I knew that they would have something just perfect for the den.  I went opening day of course right when they opened.  I had to drive around for 5 minutes and had 2 parking spaces stolen from me as I was attempting to pull in.  But I finally snagged the last space on a row.  I'm getting out of my car and there is a BMW small sedan parked behind me.  What happened next was.......an unusual encounter to say the least.

The Latina woman with big black sunglasses and extremely long fingernails began to yell at me and say I stole her space.  So I said something like "I'm really sorry, it's a busy day and I had a few spaces 'stolen' from me as well (I didn't air quote stolen.  I'm using them now as a sarcastic reference).  And I tried to laugh it off.  No go.  She starts yelling and saying "I'm not talking about YOU.  I'm talking about ME!"  The woman goes into a tirade about how "Everyone is suppose to be so nice here!  Why aren't you nice?! Everyone keeps saying how nice it is here"  So I'm completely taken aback.  Then she points to me with her long index finger nail and says "You hit me. So I hit you."  I'm completely befuddled.  I'm thinking is she gonna ram my car with hers?  Because I didn't "hit" her.  Then I thought maybe there was a slight language barrier and she was saying "hate" instead of "hit".  So I of course just walked off and snapped a pic of her license plate as I walked toward the front doors in case she did decide to "hit" me. 

After I get in the store I try to laugh it off and think "Maybe she's just having a bad day."  But then the longer I shopped the more my mind ran wild and I found myself looking over my shoulder thinking her brother and his friends are going to come kidnap me.  Or perhaps I'd walk out to my car and someone would be on top of it slamming it with a baseball bat. Turns out none of those things happened - yet.  I have a semi noticeable car up here b/c there is not an Infiniti dealership.  Not to mention a Mavs tag on the front and a razorback on the back.  And it's blue.  Seriously - it's the only blue G35 I've seen up here.  Don't worry though - still have the license plate pic.

Back to the real reason I'm writing this post is the cabinet I bought at Home Goods that day.  There were 3 contenders to choose from.  I sent pics to Joe, didn't hear back, made my own choice, then he finally texts as I'm checking out and luckily his choice matched with mine.  Love that guy.  This is what we ended up with


Joe's one problem with it was that you could see into it.  But I assured him I would fix that problem right up!  I also wasn't crazy about the black pulls so I spray painted them gold the next day. 
 
I considered lining the doors with fabric and was totally going to do it, but then I was walking around at Hobby Lobby and found this 
 
 
These are lightweight laser cut aluminum sheets - and they have all kinds of patterns.  I grabbed one to take home to see if we liked it and it was definitely the winner.  So after another trip to the Lobby, a little teamwork, a pause to go to Home Depot to get more staples for the staple gun, and then some elbow grease - we had our finished product!


The blue you see on the top shelf are just fabric boxes I got from Target.  Probably gonna go get another set.  I kinda like the peek-a-boo blue. 
 
I'm not excited how the pulls turned out.  They looked good before we added the aluminum screens but the screens are so busy I feel like I need a more substantial knob or pull there to balance.  I'll keep you posted friends!

Tuesday, October 2, 2012

Vegetable Painting - My Newest Flea Market Find


I've been pretty busy since returning stateside.  The jet lag was truly atrocious the first two weeks - not to mention Joe had to fly out the Tuesday after we returned to Chicago for the week.  So "no-nap" Evelyn and "desperately needs a nap" Mommy were left alone to fend for themselves.  The thirteen hour time difference took a toll on me.  That and I don't sleep on planes so I was always trying to catch up on sleep.
 
The Etsy store has been doing some business too since I've come home so I had to play catch up on getting orders out the door.  Last week I managed to find some time in the middle of an errand running day to hit up a Antique Mall I've been eyeing for the past year near downtown Fayetteville called The Flying Dog. 
 
The first thing I saw I bought.  It was a framed painting that was right by the front door.  It didn't have a price tag on it so I was a little nervous because a lot of the other pieces in that area were marked $80.  I ended up asking a guy that worked there after I circulated the entire store what the price was.  He said he'd ask - Oh good! That means I picked a piece owned by another employee and I can negotiate on site - that's always better than over the phone.
 
So he asks the lady behind the counter how much and she says "$60" and I'm like "Whew! That's cheaper than $80....I bet I can negotiate it down to $35." So the guy walks over to me and says "Yeah - only $16!!!!!"  $16??!! Not, $60?  I had to maintain my composure as best I could and did a mock "Mmm I'll think about it" face and then I said "Oh, ok. I'll take it."  I was ELATED!
 
The painting by itself is so-so.  The frame makes it grand!  And I knew that purple and orange would pop on my olive green walls and next to the raspberry curtains in the kitchen.  Here it is... 
 

Like I said, by itself it's nothing to write home about.  I even was thinking in the store that I'd paint over the black band on the frame but once I hung it I changed my mind.  Here it is in the room...

 
When I told Joe how much it cost (Joe is a closet Flea Market Fanatic), he almost spit his dinner out.  He said "Good Lord! The frame probably costs $60 by itself!"  Oh, at least.  I hadn't antiqued in awhile and was soooo happy to find some wall art for that space. 
 
Oh - and did you see the curtains?!  I banged those out right before I left for the Philippines.  My Mom is on her way up right now to help me try to finish the other 6 panels today.  The den has become the first priority for now.  Joe and I ordered a new couch and rug that will be here around Thanksgiving for the room.  I'm so excited!  I'm ready for the room we spend the most time in to be completely updated!  YAY!

Monday, July 2, 2012

Cane Back Chair Refurbishment


At the risk of sounding redundant: a) I learned a ton this being my first reupholster on this type of chair & b) I love refurbishing furniture! 

I've had this chair since the week I moved from Dallas - last July (almost a year!).  I found it at the North Dallas Antique Mall at Forest and Marsh in the last booth I looked in.  It met all my criteria:  Comfortable, solid, beautiful, and had some texture which I like to mix in my rooms.  I had originally been looking for a Louis style chair for my living room, but I am really into cane back and bamboo textures and was sold the second I laid eyes on it.  It had been a set of 2 chairs - but someone had already bought the other one.  That's probably a good thing because if I had bought both, this one wouldn't have made it into Evelyn's big girl room.


As you readers have already figured out - I went with the mid-hue green in Evelyn's bedspread to put on the walls.  All the fabric people are referring to it as "citron"; they just love being fancy, like that justifies the prices they charge to reupholster something for you.  Anyway, I found the pink fabric I used for the seat and cording (and cording on the ottoman) for $5 a yard!  It was originally $40 a yard - probably my best bargain find ever.  It is a linen and a bitch to work with though.  Again, for $5 a yard I was on the cusp of recovering everything in my house with this fabric.  The corally-pink of the fabric was originally the color we were going to paint the walls of the room, but it was just too much pink for me.  I'm better when I accent with pink.  It also matches the mid-tone pink in E's bedspread as well. 

The blue paint I used for the chair frame is Refresh by Sherwin Williams.  It is a stunning color and I'm probably going to paint everything I can in E's room with it (Already working on a nightstand).  Doesn't it just remind you of pool water? 


The project began with some sanding of the wood parts (not the cane back) and then painting on a layer of Kiehl's.  Then I sanded with a fine grit sandpaper and did 2 layers of the Refresh paint.  I finished off the frame with my favorite Mixwax water based polyurethane:


My biggest tip - and I had to learn this the hard way - is when reupholstering something like this, work the fabric from back to front.  I thought I would beat the system and worked front to back but now see why everyone recommends it the other way around.  I just stapled the fabric onto the frame and then covered the staples with the double cord welting that I hot glued on top of it. 

I had never done the double cord welting before and it in itself was a learning experience.  I'm going to do a post on how to do your own, and it really looks great on wood framed chairs. 

I did the chair and ottoman as a place for E and I to read books; she's already dragging the ottoman over to the bed as a way to climb up and then she says "Mommy, let's read a book in my bed."  So there goes that hope.  At least it looks good, right?

Thursday, June 28, 2012

I Put the "O" in Ottoman........Part 2

It's done.  The ottoman is done.  And I'm still standing. 


Part 1 left off with me just about to throw the ottoman away and go to the fabric store and pay out the Wazoo for new one that someone else had to upholster.  I had to step away from it for a few days to gather my thoughts and allow my fingers to heal from all the splinters the stupid wood shards left (reference to Part 1).

The rest of the construction was pretty easy.  The reason it took so long to wrap up was a result of my own procrastination.  I last left off with all the fabric pieces cut and ready to sew.  I had already sewn the top piece for the ottoman and had it fitted and lookin' fly. 

The next step was I just added some batting to the large button on top and wrapped it with fabric; affixing it with simple hot glue.

Then I made cording - yards and yards and yards of it! I used the same method for making the cording that I did in the Part 3 of Reupholstering Dining Room Chairs.  I'm not going to even lie to you - the cording makes the ottoman, but it was what made this project over the top difficult.  My one helpful suggestion for making cording is to switch over to a zipper foot on your sewing machine to not only make the cording, but also to sew it to the fabric.  I had never done that before and it made a world of difference. 

Making cording is easy, it was the sewing of the cording to the circle shaped fabric near the top that proved so difficult and time consuming.  I had to go over it about 5 times to make sure it was sewn close enough together so that no stitching could be seen. 

The cording at the bottom of the piece I just hot glued on.  I tried stapling it into the ottoman's lovely cardboard bottom - but I just couldn't get it to look right.  Glue gun was the way to go for this one!  All of the sewing was the time suck for this project.  The stripping, cutting fabric, and recovering took about an hour of time - but I spent probably 3-4 hours on the sewing (including mistakes and redos). 


To finish it up I slipped the cover onto the skeleton structure and had to close by hand the hole I left to slip the button on top through.  Then pulled the cover down, flipped the whole thing upside down, and pulled and stapled and was done!  After that I tightened the strings to pull the button on top more taught and glued the last cording on and was finally done. 

The ottoman turned out pretty darned well. For all the trouble, it was actually worth it and such a great learning experience for me. I've recovered seats on chairs before, but never anything of this magnitude. Taking on a project like this is such a great way for me to excercise my brain. You never know what's going to happen when you rip off that old fabric, that's for sure. And it's such a feeling of accomplishment when you think it out and weigh the options and come up with a positive result!

It looks great in Evelyn's big girl room and I'm about to start making More cording for the chair that the ottoman is going with.  I hope to be able to post about that tomorrow. 

Wednesday, June 13, 2012

I Put the "O" in Ottoman. As in, "O Crap - What Have I Gotten Myself Into?!" - Part 1

So this is a continuation of my Manic Monday post.

Background:
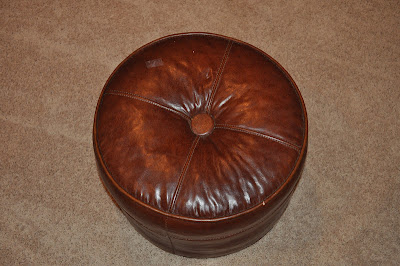
I was specifically looking for an ottoman to go with the cane back chair in Evie's big girl room a few weeks ago.  I decided on a whim to hit up my favorite antique mall, Belle's Plantation House Antique Mall in Lowell, and in the next to last booth - I find it!  It's the perfect shape and with a $15 price tag - I literally grabbed it and ran to the register lest anyone else steal my fabulous find.  Here it is:


Hideous, isn't it?  But the shape!  And I can totally play up that tufted button and add contrast cording and make it beautiful. 

So I go into this endeavor Monday with all the confidence in the world.  After the rough start to do the day, I took the recommended bath (thank you Baby Joe) and decided to get some stuff done!

My game plan is to strip the fabric off.  Then cut it up and use it as a pattern for the new fabric.  Make and add some custom cording and viola I'm done within 2 hours.  So I go upstairs and get all my little tools and flip the ottoman over and start pulling out staples with my flat head screwdriver and see a foreign substance has collected at the bottom of the ottoman.


 Yes - that's what I think is hay. 


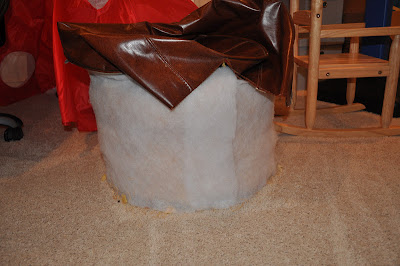
Now I'm thinking "Hmmm that's really odd.  Maybe it was in a barn at some point.  So I keep pulling staples and get the entire fabric loose from the bottom.  I find the side seam and run my seam ripper down the side, pull it open and find...

What the what?!  More hay!


Yep.  My awesome Monday continues.  So the hay at this point is getting all over the carpet (which lead to my discovery that our central vac system has stopped working as mentioned in yesterday's post).  I did a little test to see how deep the hay goes.  I was hoping it is a layer of an inch or two and I'll just replace it with batting.  No go.  The entire piece is just hay.  But then I take a closer look - not hay.  Wood shavings.  Are ya kidding me? 

And it gets better - look what I found when I completely stripped it down.


I do love me some old, moldy foam.


I decide I have 2 options:  A)  I can toss it in the trash can.  The trash gets picked up Tuesday morning and I'm only out $15 and 30 mins of my time.  Or B)  Why must I be so stubborn?  So I decide I will not let this ottoman defeat me.  It's time to regroup.

First thing I do is grab a trash bag and get that moldy foam out of there.  Next, in order to stop the "bleeding" of the wood shavings all over my floor I wrap the sides with batting.  That's when a good thing happened.  The batting just stuck to the wood without needing anything to attach it.  Score for Beth!


Then, I remove the fabric from the top of the ottoman.  Now, here is the tricky part.  The tufted button is connected to strings that pull all the way through the entire ottoman.  So if you look at the bottom of the ottoman you see this:


I need to untie that knot and let some slack in the strings to make this workable.  After breaking my seam ripper and an ink pen, I found that using two sets of tweezers simultaneously worked easiest to untie the knot.  I then tied a knot at the very end of the strings and moved on.

I had plenty of foam scraps laying around from various projects so I just cut some to fit the top of the ottoman and placed it there. 

 
Alrighty - time to move on to fabric now that the mess making hay is compromised. 

As I originally planned I cut up the old fabric and used it as a template for the fabric pieces.  The sides were super easy.  I did, however, need 58 inches to do the circumference and unfortunately the fabric I'm using is only 54.  Bummer.  So I will end up with two side seams.  I'm not happy, but I'll deal. 

The top part was definitely 8 times harder than the sides.  I cut 4 triangles, but when I laid them out they didn't equal a circle.  They equalled less than that.  So I placed them on the corner of my cutting mat to make each a perfect 90 degrees before I sewed them together.  I put it on the ottoman to make sure it fit and it did!  Whew.  Dodged a bullet.  Note that I did not sew one of seams up completely so that I can feed the button through.  When I have my finished product, I will feed it through and then sew the remainder of that seam from the inside. So here's what I had at the end of Day 1.


Thursday, April 5, 2012

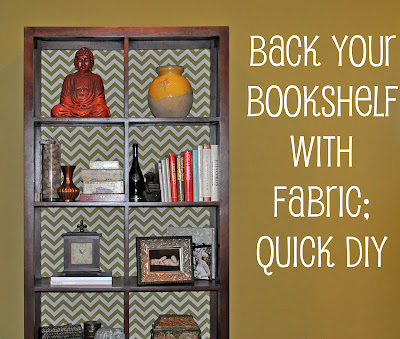
Fabric Backed Bookshelf


This was a super quick DIY, try it out this weekend!

On a whim, I decided that the bookshelf in my den needed some brightening up. So I measured my bookcase twice (measure twice, cut once), went to my new favorite fabric store in Bentonville, M. Grace, and got the proper yardage of Premier Prints' Zig Zag fabric in Village Green and Natural.  The green matched my walls and the natural matched my trim.  Perfect fit!!

After I got home I trimmed off the 1.5 inches of natural fabric from the sides and made sure the top and bottom were cut perfectly straight.  Then I spent about the next half hour starching and ironing and steaming the fabric to get the wrinkles out. 

Next I busted out my staple gun, lined up the fabric, and got going!  The dogs were in a panic from the staple gun noise, but I was giggling from excitement!  I started by stapling and securing the fabric all the way across the top first.  Then I went down the middle of the bookshelf and made sure the fabric was lined up and secured that.   Then I did the left side and bottom left and right side and bottom right.  It was super easy and fast - and then I had an accomplished project and felt like a million bucks.  I love Thursdays!


This will be the last of my chevron infusion into my home for awhile.  A little goes a long way, and I don't have many more rooms to put it in.  Guess I'll have to move on to greek key!

Thursday, February 16, 2012

Recycling Windows

Each time I'm antiquing I always see salvaged windows for so cheap!  I always look at them and see a $5, $7, or $10 price tag and I SO want to buy them, but I hadn't come up with a perfect use for it yet.  That was until Saturday when Beth at Unskinny Boppy posted this blog about her antique window turned shadowbox which is her most prized possession. 


I adore and covet it!

She gives instruction on how her husband made the window into a shadow box and tells the sweet story of how it came about.  I love her wedding dress - and what a great use for your wedding day bouquet!!!

I didn't keep my bouquet (big regret now), but I'm going to brainstorm some other items I can put inside.  I think I'll do one with a mix of pics from Joe's and my wedding and maybe a pic from the honeymoon and one of Evelyn as a baby.  What a great idea! I'm really excited to get working on this project.  You know, after I finish the other 15 projects I have on tap.

Some other ideas for salvaged windows include:

Hang them as wall art


Frame a mirror


Photo courtesy of Madigan Made


Mount floating pictures


Both of the above photos courtesy of Pacific Mutual Door


Turn it into chalkboard/magnetic board/dry erase board


Courtesy of Red Hen Home

Paint or etch a saying or quote onto the glass

Courtesy of Paint Me Shabby


You could also place scrapbook paper or fabric behind the windows to use as wall art as well!  Share any ideas you might have. 


Wednesday, October 26, 2011

Entryway Bench

Sorry for my no posts on Monday and Tuesday.  I've been fighting a sinus infection battle from the couch, but now I'm back in business and knocking out tons of little things around the house. This week is going to be filled with a lot of mini posts since I'm doing lots of small projects. 

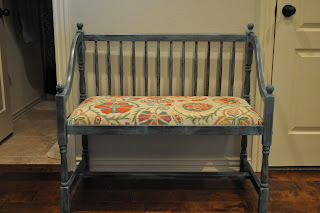
I bought some beautiful fabric at Sew Chic in Rogers (sadly they are going out of business but I got the fabric for 50% off :) ) to use to recover my entryway bench.  I wanted to pop the neutral entryway with turquoise and orange accents and this was just too perfect.  I love this fabric so much I'm thinking of recovering things and adding pillows with it in about 3 other rooms of the house.  I did some before and after pics below. Hope you enjoy!

Before:  A drab brownish material.

After: Bright and Cheery


 I feel like the fabric change really lightened up the space. 

For directions on how to recover a bench seat, see here


Friday, October 7, 2011

Laura's Refurbished Guest Room Dresser

One of my oldest and dearest friends, Laura, now lives less than a mile from me.  I invaded her neighborhood in our recent move and now we get to spend lots and lots of time together! (Apparently day in and out circa 1994-2000 wasn't enough for me; also after college she moved to Fayetteville so we had 2005-2007 together). 

Laura is such a creative cat and in the past few years has become quite the artist.  I'm commissioning her to do a few paintings for my new house and can't wait to buy canvases and get her started.  You will also be seeing some of her crafty creations on here in the coming months as well as we are daring to reupholster a cane back chair together (*gasp!).  

After we moved back to Arkansas, I was doing an updated tour of the house she's been in for 5+ years now eww'ing and aww'ing over all her amazing art and updates to the house and for some reason almost came to a halt when I saw this in the guest bedroom:


Apparently I've seen this piece before, as there are two pictures evidencing this from my wedding day (I got dressed at Laura's house since it's down the street from the chapel in which we were married):


I'm unsure how I missed the fabulousity of this for so many years, maybe it was the placement in the room, maybe because it was my wedding day and it was all about moi.  Who knows, facts are I see it now and have a crush on it.

Laura tells me that Will's mom (Will being Laura's wonderful husband) gave him this piece of furniture.  "It was blonde wood and had been in the family for years and she didn't want it anymore, but we weren't allowed to throw it away.  So, it sat in our garage gathering dust since it didn't go with anything in our house."  Laura and Will have a much more contemporary house.  A few years ago in the fall Laura woke up one day and thought "Today, I want to paint."  (I have days like that.  I had one last week to paint the guest bathroom so I took a bar of soap to Spectrum Paint (my Benjamin Moore dealer) and had them match it and voila! new bathroom.)  Laura had to do a Wal-Mart run for grocery shopping and she happened upon the color "called Red Pepper.  Probably the fall leaves had something to do with my choice.  It's a satin enamel interior latex paint and covered well.  I did 3 coats and since it was shiny, no polyurethane."  Laura redid this piece in 2008 so we aren't sure if Wal-Mart still carries this color.   


I agree with Laura, the paint job she did is just perfect and you can still see a bit of wood tones peeking through the paint.  Using poly on it would have made it too shiny, and I prefer a non-poly look on antiques.  Laura used an electric sander on the to get off the original poly and stain.  Beth Note:  Always sand with the grain of the wood!

I love how Laura thinks outside the box.  She replaced the pulls on the top two drawers with crystal-like knobsshe found at Target. It really transformed the piece.  I also love the keyholes; newer furniture pieces tend to not have those suttle touches.    

It's always amazing to me how a simple change of pulls and/or knobs can completely transform cabinets or furniture.  Along with the amazing color choice, the knobs really made this dresser become a Wow! piece.   

As you can see, this beautiful dresser now fits perfectly in Laura's more contemporary home.  Remember, the best designers must be capable of mixing old and new!  I'm all about refurbishing furniture instead of buying new (Reuse and Recycle, please),  and will have tons of examples of such in the future like this.  If you have something you want to contribute, please share with me!

LinkWithin

Related Posts Plugin for WordPress, Blogger...