Pages

Showing posts with label Recipes. Show all posts

Thursday, July 12, 2012

30,000 Calorie Cake


Due to network TV's summer hiatus we are able to finally catch up on entire seasons of shows.  One of these is Cake Boss - which is great to watch as a family.  Evelyn loves to see the finished cakes and is always stacking her toys on top of each other and saying "Mommy/Daddy, I made you a cake" or "Let's eat some cake!!!" (Her own play on Buddy's "Who wants to eat some cake?!"

Yesterday was Joe's 30th birthday and Evelyn wanted to make him a chocolate cake.  So we did.  I played with the idea of mint chocolate chip frosting, but I invented those Mint Chocolate Chip Cookies for him already.  Joe's second favorite sweet to eat is Reese's peanut butter cups and he loves peanut butter pie.  So I decided to go with that idea. 

Last night before we dug in I posted a picture on Facebook of the cake Evelyn and I made for him and it blew up with comments and "likes" - so I decided to share the recipe here for others to make.  I captioned the photo with "For Joe's 30th birthday, I made him a 30,000 calorie cake."  I brainstormed some other names for the cake, but like the original better. 

I totally copped out and used a boxed chocolate cake mix.  I used Duncan Hines Dark Chocolate Fudge cake mix and even though I substituted 3/4 Cup of milk and 1/4 Cup of Hershey's chocolate syrup for the 1 cup of water - it still wasn't chocolately enough for me.  Next time I'll do a homemade chocolate cake batter instead. 


In short, make the chocolate cake of your choice.  I split mine between 2 9 inch round pans for baking so I could stack them. 

Sidenote:  I usually use milk instead of water for any baking mix.  It makes it more moist. 

Next I made the frosting - which I just kind of made up as I went based off of a cream cheese frosting recipe. 

Peanut Butter Frosting:
4 Cups Powdered Sugar
1 1/2 Cups Creamy Peanut Butter
8 ounces of 1/3rd less fat Cream Cheese**
1 stick of Unsalted Butter
1/4 Cup Crisco

Make sure the cream cheese and butter are room temperature before mixing.  Combine all the ingredients in a bowl and mix them together. (It's that easy!)

After the cakes had cooled completely I laid down one layer and sprinkled some mini Reese's peanut butter cups on top. 


Then I iced that layer with the peanut butter frosting. 

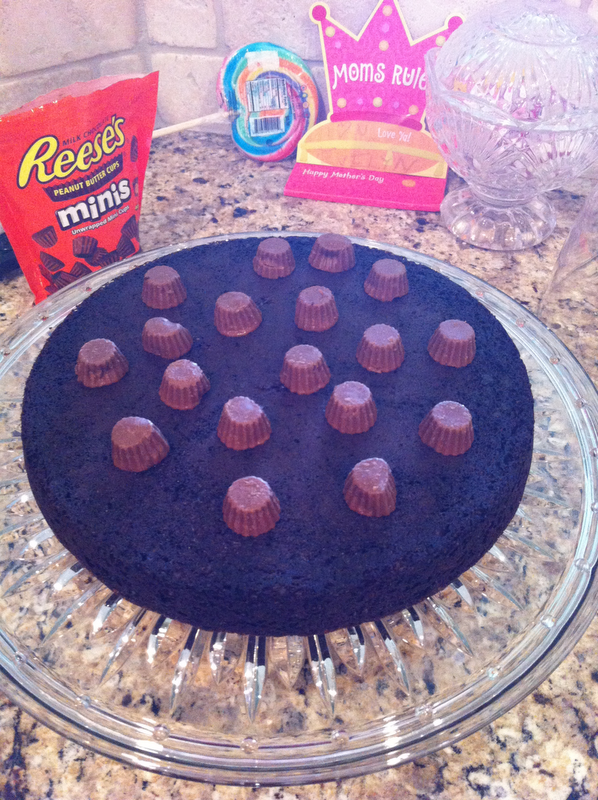
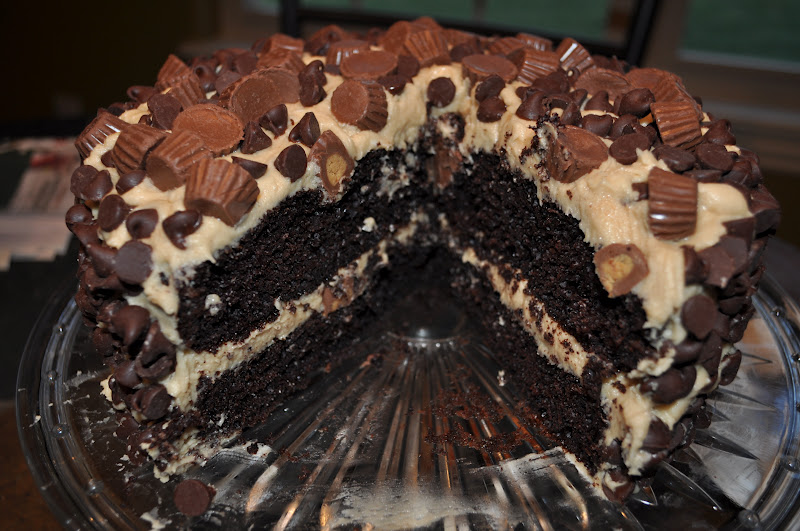
Next I added the second cake layer and frosted the entire top and outside of the cake with the peanut butter frosting.

Last, I grabbed some semi sweet chocolate chips and the rest of the mini peanut butter cups and smashed them into the sides and top of the cake.  It really was delicious and not as rich as I expected.  We enjoyed it with 2% milk!  


Joe had a great birthday and after a Chipotle dinner and some cake we were stuffed.  I still felt full this morning! 

If anyone has a suggestion for a good boxed chocolate cake mix please comment.  I need to know some others to try. 

Tuesday, January 3, 2012

Baked Southwestern Eggrolls

This one was requested for dinner last night from my hubby, so I obliged him.  This makes a ton of eggrolls so they are great for a snack for parties.  I made about 20 last night so I had leftovers for lunch.  They are very hearty and it's a meal in an edible wrapper!

I recommend using this brand of eggroll wrappers:

They don't have too much flour on them, and they get the perfect amount of crispy when cooked. 

Ingredients:
2 Cups shredded cheddar cheese
2 Boneless skinless chicken breasts
1 package frozen spinach (10 ounces)- thawed and squeezed dry
1 16 ounce container of On the Border Medium salsa
2 Cups of corn (I've used both canned and frozen - no preference)
1 Can of black beans (15 ounces)
1 4 ounce can of green chiles, drained
1 t. cumin
1/2 t. chili powder
1/2 t. salt
1/2 t. ground black pepper
1/4 t. ground cayenne pepper
1 package of eggroll wrappers (usually found in the produce section)

Heat a skillet on the stovetop to medium heat.  Add the 2 chicken breasts and entire container of salsa and simmer the chicken on both sides until thoroughly cooked.

While the chicken is on the stovetop, combine the rest of the ingredients (other than the eggroll wrappers) in a large bowl.  Mix well to blend.  When the chicken is done cooking, mince the meat and add the chicken and salsa into the bowl with the rest of the ingredients.  Mix thoroughly and it will look something like this:


Now it's time for us to roll!  Lay the eggroll wrapper on the counter with one of the corners pointing towards you.  Place about 1/4th a cup of the filling in the center and then mold into a rectangular shape.  Pics below:


Take the corner closest to you and fold up and roll a tad.  Then you will fold in the sides, and keep rolling until a small part of the remaining corner is free.  Dip your finger in water (I keep a small bowl on the counter to dip freely) and brush it on the free corner.  Then finish rolling.  The water helps seal the corner. 


Preheat the oven to 425 degrees F.  Lightly oil a baking sheet with cooking spray.  Place the sealed eggrolls seam side down on the sheets and lightly spray the tops of the rolls with the cooking spray.  Bake for 16 minutes, or until lightly brown, turning halfway through the baking. 


The eggrolls will come out of the oven piping hot and will retain their heat for quite awhile, so I recommend letting them sit for about 10 minutes before you start eating.  I serve mine with ranch dressing with some fresh jalapeno diced and mixed into it.  The cool of the ranch pairs nicely with the spice of the eggrolls! 

Monday, December 19, 2011

Mint Chocolate Chip Cookies

I'm just now getting my internet working after fighting it for a week, and even at that - it's still intermittent. I'm still sick and for some reason still refuse to go to the doctor. I also did my weird neck tweaking thing I do every few months or so and was pretty immobile on Saturday. You know...things are great.

But seriously, I am feeling better and my neck isn't so bad today and best of all I think I'm finally into the Christmas spirit. I had an ugly Xmas sweater party to attend this weekend and Joe and I doning our outfits and seeing everyone in red and green really gave me an attitude adjustment. So bring on the carolers, cards, lights and merriment!

As previously discussed, I love me some mint. At my job in Dallas, it was so renowned I loved mint that people would bring me back their Andes or puffy mints from when they went out to lunch. I love my ex-coworkers!

I came up with this cookie last spring sometime after I found the Andes Creme de Menthe baking chips at the store one day. I have a problem with stopping myself from eating them once I get started. I'm not in denial, this is not a "pretty" cookie, and one thing I've learned from Pinterest is people like a "pretty" presentation or else they ignore the recipe. But I assure you what these cookies lack in looks, it makes up for in a burst of mint chocolatey deliciousness in your mouth.


Ingredients:
1 3/4 C. flour
1/4 t. baking soda
1 C. butter - softened
1 t. vanilla extract
1 C. sugar
1/2 C. dark brown sugar
1 egg
1/3 C. unsweetened cocoa powder
1 T. milk
1/2 t. salt
5 ounces of Andes Creme de Menthe baking chips
1 handful of semi-sweet chocolate chips

Preheat your oven to 350 degrees.

In a small bowl mix together the flour and baking soda and set aside.

Cream the butter using an electric mixer. Add vanilla and both sugars and continue to beat until fluffy. Then add the egg, cocoa, milk and salt.

Add in the flour mixture - but mix with a wooden spoon. (As I don't have a wooden spoon I turn over my rubber scrapper and use the wood handle part to mix). Then fold in the chocolate chips and Andes pieces also with the wooden spoon.

Dollop them onto a greased cookie sheet (I use non-stick cookie sheets) and bake for 12 minutes. (If you want them to be prettier - like I did for the pic - take some extra Andes baking chips and press them into the top of the uncooked cookie dollops).

Makes approximately 2 dozen cookies.

They are festive and compliment pretty much anything you could want to eat anytime of year. I haven't had a problem finding these Andes baking chips as I did with the peppermint bark chips.

Friday, December 2, 2011

Peppermint Bark

Now that it's December it's time for an overabundance of sweet holiday treats.  I love mint anytime of year, but this is the only time of the year I can make one of my favorite desserts because of product availability.

Joe and I love mint chocolate chip ice cream throughout the year, but now that it's holiday season Blue Bell has their Peppermint ice cream available (Braum's has it throughout the year some places).  When I was grocery shopping Monday I picked up my tub of peppermint ice cream and then thought of a recipe my mom and I made up about 7 years ago after having some of Williams Sonoma's Peppermint Bark. 

Williams Sonoma can eat it.  My mom and I came up with a better tasting recipe and it does not include paying a ridiculous amount of money for it.  AND....it's only 3 ingredients!  So simple and so hard not to stop eating it.  Give yourself about 30 minutes to complete this start to finish, and that includes hardening time for the almond bark.

Ingredients:

  • You will use an entire package of the Plymouth Pantry Vanilla flavoredAlmond Bark.
  • You will use about half a bag of the Andes Peppermint Crunch.
  • You will use about half of the Bob's Sweet Stripes soft peppermints.
  • Items you will need:  Microwave safe bowl, wax paper, cookie sheet (preferrably with sides), and a rolling pin/hammer/meat tenderizer...something to smash things with. 
Note:  The Andes Peppermint Crunch is hard to find and is only available in stores around Christmas time.  I found it at Wal-Mart and it was not on the cooking aisle, it was in a large mid-aisle display in the food section that had holiday specific items like jellied cherries, pumpkin pie filling, etc... 

Directions:  Open the bag of Almond Bark, break it apart, and place in a microwave safe cooking dish (I used my big Pyrex bowl). 


Next, you will need to unwrap about 2 cups worth of the Soft Peppermints.


Next, you will place the peppermints in a ziplock bag and smash them via a rolling pin or any other device of your choosing.

You'll want to break them into pretty small pieces so they disperse easier
in the melted almond bark, and you want them to be chewable in the bites you take. 

Now it's time to melt the almond bark.  I put mine in the microwave according to the directions for 90 seconds. That amount of time almost had it completely melted after I removed it and stirred for about 2 minutes.  Then I popped it back in the micro for the recommended additional 15 seconds and that did the trick. 

While the almond bark was in the microwave I lined my cookie sheet with wax paper.  I lined it horizontally and then vertically to make the removal of the bark after it dries easier. 

Add the crushed soft peppermints to the almond bark and mix thoroughly and quickly.


After your peppermints are all mixed into the almond bark, you will just poor it onto the cookie sheet and start spreading it out with a rubber scraper.

You'll want to spread the mixture out as thin as possible without any gaps. 
This is why its important to really crush up the soft peppermints. 

After I got all mine spread out this is what I ended up with.  I didn't use up the entire cookie sheet. 


Last thing is to just sprinkle the Andes pieces on top and push them into the mixture.  If you don't, they'll come off when you break the bark apart. 


And there you have it!  Make sure it is hard before you break it apart.  I let mine sit for about 15 minutes before I broke it into pieces.  Just enough time to unload and reload the dishwasher and lick every leftover morsel off the rubber scraper and Pyrex bowl. 

I broke mine into pieces by hand, but you could use a cookie cutter to do shapes or use a knife to cut squares, rectangles or triangles.

If you prefer your mint with a little chocolate, you could melt a layer of the chocolate almond bark on the bottom of the cookie sheet before you add the white chocolate mixture.   

Here is the finished product!


Monday, November 28, 2011

Sweet Potato Souffle and Post Thanksgiving Reflection

I don't know about yall, but Thanksgiving wore me out this year.  We had it at our house and I cooked everything for the main course - which is usually no big deal, but afterwards I was really fighting sleep and continued to do so until this morning.  Maybe Joe and I were just taking advantage of not having to do anything. 

Joe has been working 60+ hour weeks at work because of year end for the past month and a half, so it was very nice to spend time with him.  I knew I had missed him, but not how much until I had him back.

Enough of me being sentimental.  Thanksgiving Day this year also marked the day Evie dropped my phone in the potty during an extended attempt to go pee pee in the potty. I thought maybe watching some YouTube videos would relax her and allow her to....you know.  Instead she dropped it in the potty and I stupidly tried to turn it on and fried the entire thing.  So I have my first iPhone shipping to me right now.  I'm a little nervous about  not having the security of my QWERTY keyboard from my Blackberry, but I'm sure I will persevere.

Evelyn also went poo poo in the potty for the first time - it was epic.  Enough said.  I don't want to embarass her too much.

We also bought a couch for our Bonus Room upstairs after much overanalyzing done by both Joe and myself (you can take the girl out of accounting, but can't take the accounting out of a girl).  Right now we watch TV from the comfort of our floor, so it's kinda a big deal.

Profound Thanksgiving Reflection:  (drumroll, please)  The best thing about Thanksgiving is the leftovers.  The worst thing about Thanksgiving is the leftovers. 

Leftovers are bad because we have sooooo many leftovers that we will eventually throw out and I feel wasteful.  Why won't people take leftovers with them?  We actually had an entire pumpkin pie still in tact after having a 14 family member dinner.  I blame Joe entirely, because he requested a peanut butter pie from my mom and everyone was intrigued and wanted to try it this year.

Leftovers are good because they are sooooo good.  We've had 2 leftover meals since Thanksgiving dinner and I'm still looking forward to another leftover lunch today.  Why don't I make this meal more often?

My favorite leftover and this year's big hit was the Sweet Potato Souffle I made.  My parents gave me The Los Barrios Family Cookbook two Octobers ago after meeting the author, Dianna Barrios Trevino.  In short, they own a renowned Mexican restaurant in San Antonio.  Low and behold the most amazing sweet potato casserole recipe was inside this cookbook.  It was the first thing I made when I got it and Joe and Evelyn have both gobbled it up every meal since.  I've made a few changes to the original recipe - for one, I reduced the amount of sugar by half.  That's how sweet this thing is!!  Joe was not a sweet potato fan before I started making this, so it's really worth a try.

Ingredients for souffle:
2 cups mashed, cooked sweet potatoes
2 eggs, beaten
3/4th cup sugar
6 Tablespoons of butter
1 cup milk
1/2 teaspoon ground nutmeg
1/2 teaspoon ground cinnamon
1 teaspoon almond extract

Preheat oven to 400 degrees. Grease a 9 by 13 inch pan. Combine the above ingredients (I use a mixer) and put in the pan. Bake for 20 to 25 minutes or until it sets.

While the souffle is baking, prepare the topping.

Topping ingredients:
6 Tablespoons butter
1/2 cup packed dark brown sugar
1/4 cup crushed cornflakes (optional)
1/2 cup chopped pecans (optional)

Mix the ingredients and when the souffle is done with it's initial cooking period, spread this on top and cook an additional 10 minutes.

I had never tried the cornflakes before Thursday, but I went ahead and tried it and did not like it as much as just the butter, sugar, and pecans.  Joe hates pecans so I leave those out often and it's still delicious. 

Now it's time for Christmas decor to go up.  That should keep me busy for a few days as well as the many crafts and projects I have planned.  Come back and visit soon!  I'll have some gift ideas, DIY projects, and obsessions going out this week! Besos.

Monday, November 21, 2011

My Italian Meatballs


This one is a bit of work, but not too much and definitely worth it.  Months ago I was googling for the perfect Italian meatball recipe and who would have thought that about 170 different middle aged Italian women claim that theirs is the best.  So I spent the last hour at work one afternoon (sorry Kenya!) combining a few different recipes and coming up with something pretty great on my own. 

I do make a double batch and freeze half so that next time I get a hankering I can just pull a container out of the freezer and Boom! dinner is done. That and it's easier to buy 16 ounces of meat than 8. *wink

Ingredients:
16 ounces ground beef
16 ounces italian sausage (last time I used Hot sausage and I will say I don't think they were as good)
2 eggs (lightly beaten)
6 Tablespoons red wine (I use Zinfindel)
4 Tablespoons tomato paste
1 teaspoon salt
1 teaspoon black pepper (ground)
1 cup seasoned italian breadcrumbs
2 garlic cloves
2 Tablespoons parmesan cheese (I use Kraft shredded parmesan)
1 Tablespoon dried onion flakes
1 Tablespoon dried oregano
1 Tablespoon dried basil

Start with beating the eggs in a small bowl, then add in the red wine and tomato paste.  Set this bowl aside.

Place the beef and sausage in a large bowl and blend with your hands.  Then add the breadcrumbs and the rest of the dry ingredients. After that is thoroughly mixed, add in the egg mixture from earlier. 

If the mixture seems a little wet, add some more breadcrumbs a few Tablespoons at a time.  If the mixture seems dry, add more tomato paste.

I then just use my hands to roll the mixture into balls and place them on a non-stick cookie sheet.  Pop them in the over at 400 degrees.  Let them cook for 10 minutes.  Then turn them and cook for another 10 minutes.

I then put the meatballs into a large pot with my red sauce and let it simmer for about 30 minutes.  This really adds to the flavor for both the meatballs and the sauce. I use Rao's Marinara Sauce.  Unbeknownest to me the first time I purchased it, it runs like $7 a bottle!  But it is seriously the best sauce I've ever had.  They carry it at both Wal-Mart and Target.


To help cut down on costs I usually use a bottle of Rao's and then add a bottle of Ragu's Super Chunky Mushroom. 

Then I serve with angel hair pasta and a little monzarella and parmesan.  Dinner is served!


If Evelyn loves it, you should love it.  I did take her dress off before we ate that night.


Wednesday, September 28, 2011

Yummy in my Tummy: Chicken Spaghetti

As a former full time working mom, I know the importance of a quick delicious meal that everyone will love.  This one is sure to please and only takes 30 minutes!  I have made this with whole wheat noodles and it throws off the taste.  I've never done it with gluten free noodles, but if you try it and it turns out good - please let me know!

Ingredients:
3 boneless skinless chicken breasts
Spaghetti Noodles (angel hair or regular)
1 packet of Lipton Onion dry soup mix
1 can of Original Rotel
12 ounces of Velveeta or another melting cheese of your choice (this is about 3/4ths of a block)
Spaghetti Noodles
Optional Ingredients:  Half an onion and a green pepper

Get a large pot and fill with water; bring to a boil.  Cut up chicken breasts into about 1/2 to 1 inch cubes and throw into the water. Add the spaghetti noodles (I use a good size handfull.  I took a handful and was able to stick all the ends of the noodles into a tablespoon.)  If you choose to add the onion and green pepper, do that now.  Cut them up into 1/2 inch to 1 inch sized pieces and throw them in the pot with chicken and spaghetti to boil. 

Below is a pic of the new kitchen stovetop area
Once the noodles are full cooked, slowly start to drain out the water, BUT do not drain out all of the water.  Leave enough so that the top of the noodles are just sticking out above the water. 

I hope you can see the water line around the edges.  It's just about right even with the top of the chicken and noodles.
Turn the heat down to Low on the burner.  Toss in the Rotel and Lipton Onion dry packet ingredients and stir.  Then cut up the Velveeta and add to the pot.  Stir occasionally to make sure the velveeta is melting.  Once all the cheese has melted and you have a creamy consistancy, Enjoy! 

The final product.  Delicious!

LinkWithin

Related Posts Plugin for WordPress, Blogger...