
As you know, my walls are bare in this house. I've been doing better and finally decided to take on another art project and really wanted to paint something. I am a horrible artist. HORRIBLE. I'm not sure how because my mom can sculpt, paint, draw - all of it. My dad also is awesome at drawing and Joe is better than both of them put together. Hopefully it just skipped a generation and Evelyn will be A-MAHZING. So I decided over the weekend the painting I did would have to be something easy like lines.
I found some inspiration on Etsy in the form of ikat chevron paintings - but decided everyone would roll their eyes and be like "Ugh - get off the chevron already". But seriously - try and tell me these paintings aren't kick ass...

Table for Two, 1 of 2 paintings - Photo courtesy of jmoreman82 shop on Etsy

Custom Ikat Chevron - Photo courtesy of jmoreman82 shop on Etsy

Chevron and Roses - Photo courtesy of jmoreman82 shop on Etsy
These are all by Jennifer Moreman and here is a link to her shop on Etsy. I love how she throws in the metallic paint to catch the light and attract the eye.
So after I made the decision to diversify my designs I ran across this little ditty on Pinterest:

Photo courtesy of Maria Teorien's blog
As usual I made a few little improvements on the process and just started painting!
Sunday: I went to Wal-Mart and for $4 grabbed a bottle of Rustoleum Gold Metallic spray paint and grabbed a cheap 24inx36in canvas at Joann (on sale for 50% off). Went home, went outside, and sprayed the entire canvas until the entire bottle of spray paint was gone. I always forget how absorbant canvas is.


Then I started taping off the canvas - I pretty much used Maria's painting as a guide. I grabbed some 3/4ths an inch Frog Tape at JoAnn to use.

After that, I busted out an item I've been wanting for a long time but had no reason to purchase until now..................the Gold Leaf Paint Pen.

Just the shiny package alone makes it extra special, and the fact it says "18 KT." right in the name makes me feel special. It usually costs $7.99 at Joann, but I had a 50% off coupon (holla!) or else I wouldn't have gotten it. I will say after using it, it IS that much better than a regular gold paint pen. Do it.
So after the clouds parted and sun rays stopped shining on the pen and the angels stopped singing, I got down to biz-nass. I did my same old trick where I use the same color to "seal" the paint to really get those crisp lines I needed. So I just used the paint pen up and down across the tape to do that. As usual, worked like a charm.


Monday: Took Evelyn to school, then hit both JoAnn and Hobby Lobby to stock up on paint. I already have a lot of paint around the house from other crafts I've done as well as paint for the walls. And I did use both kinds for this canvas. I wasn't sure where but I knew I wanted this painting to go in the olive green den/kitchen area. Because of this I wanted to make sure that a lot of the colors in the fabrics I'm using make it into art to help it blend. So I mostly picked up different reds, pinks and purples at the stores that morning. Here are 2 of the fabrics I'm using in this area:

Robert Allen Woven Jacquard Ikat Fret in Raspberry - Image courtesy of Fabric.com

Swavelle/Mill Creek Taraz Berry - Image courtesy of interiormall.com
So, I grabbed a bunch of different brushes and started painting. I'm glad I had such a variety of colors to work with because you want to spread each color out among the canvas and not have (example) all 3 of your yellows bunched together. It took a lot of pre-planning after each shape was filled in and sometimes I went back and painted over some colors. I made another trip to the Lobby later in the day to pick up a few more colors like the peach, bright blue, and bright yellow but mostly just worked with what I had laying around the house. One of the colors is my bedroom wall color; another is the dining room; another is E's nursery color. Some are samples I got for rooms. But mostly I just used Apple Barrel and Delta acrylic paints and did 2 coats of each - sometimes 3. The yellows were the worst about getting an even color across the entire space.
It was funny to look at the table and see how many paints I had already used - but then to look at the canvas, it didn't look like that many...........see what you think.

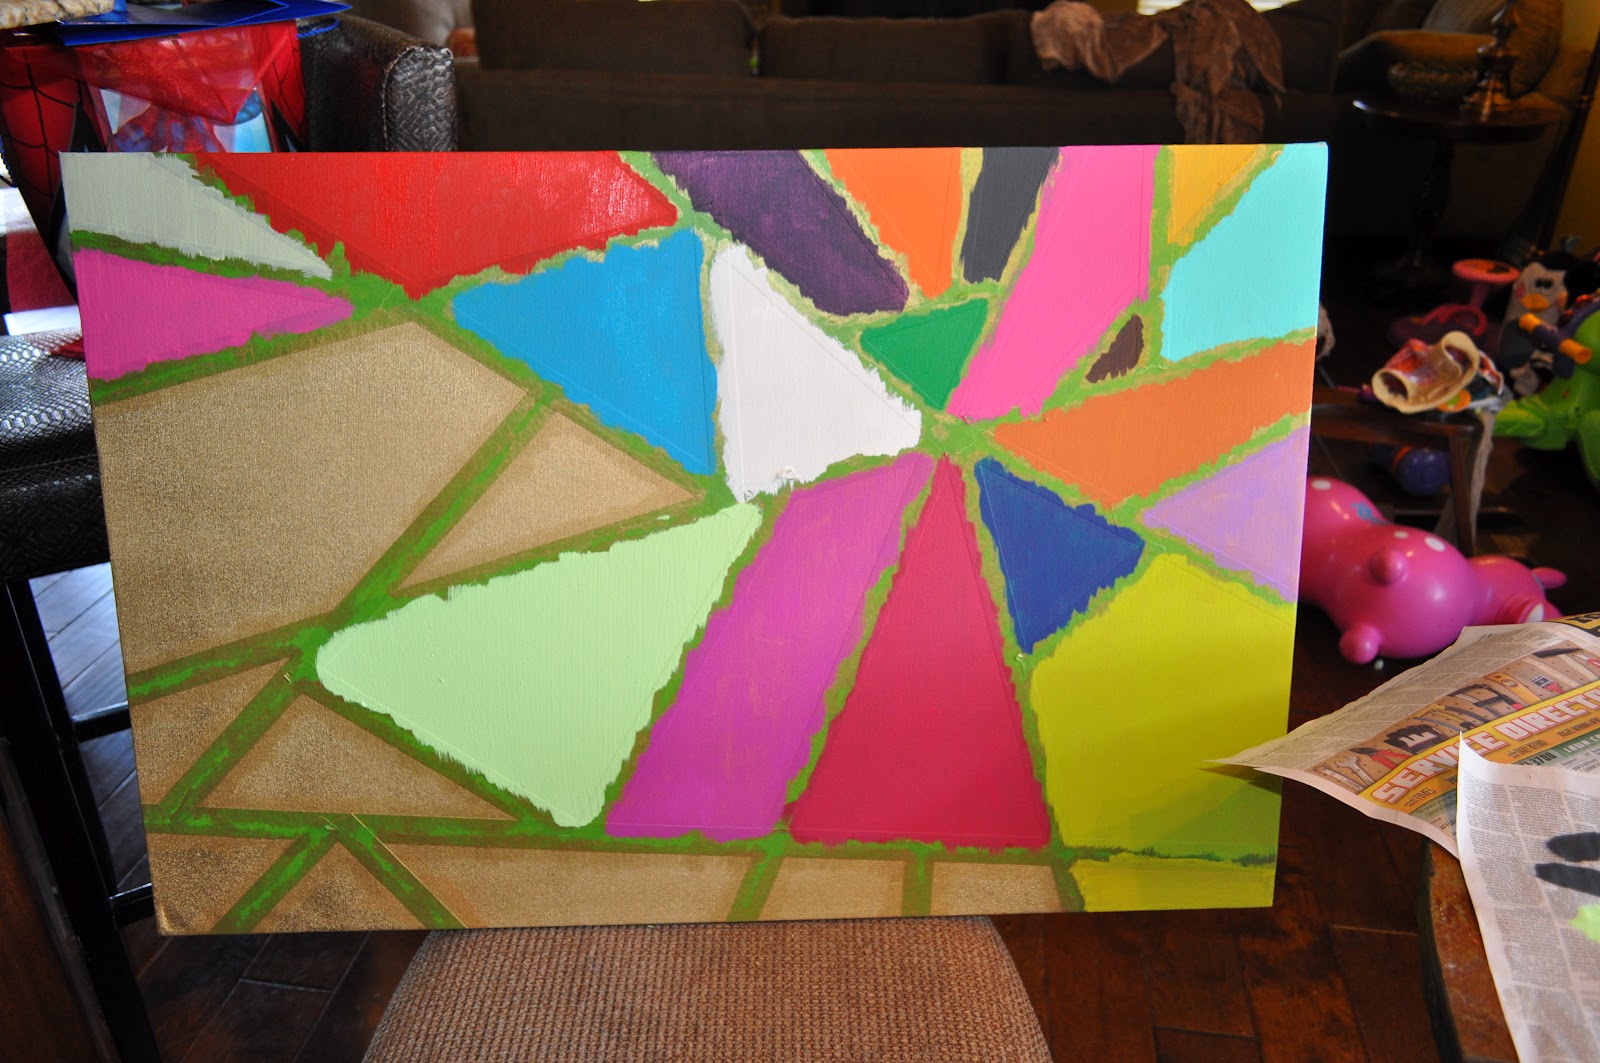
And here is a look at it after I got the entire thing painted.

I painted from around lunch time to the time I went to bed (with breaks for dinner and picking up E from school of course).
One tip I can share is to work from one corner - fanning out when picking which color goes where. Don't start painting and say "I'll put a blue here, here, and here." You will be repainting and repainting if you do it that way. I'm super impatient so it was very hard for me to not do that, but definitely the method to follow.
Another tip - when doing your second coat of paint, work from top to bottom. I had a few drips and splatters while I was painting and it always landed below the area I was painting.
Tuesday: Surround sound was installed in the den and took all day long so I had to wait until the evening to do a little touch up. Joe's been working until about the time E goes to bed (quarter end) so I waited until he got home to do the big tape pulling and reveal...........drumroll please.................................


I love it!!!!!!!!!!!!!!! And Joe loved it too. He didn't understand what the tape was all about until I pulled it off, but he really was impressed with it. Here's the problem though, I had a spot all picked out to place it - but we like it so much we are thinking of putting it above the couch so we can see it all the time! Perhaps I will put it to your vote. All I have left to do is add a hanging kit and put it up. When Joe gets home tonight I'll have him hold it in a few different places and I'll let you know!
I'm really getting into this wall art thing - if you have any ideas of stuff to try out please let me know. I think the next item might be something with painted pieces of wood. I'm giddy with excitement over here - no more Dr. Pepper for this lady today ;).
looks awesome!! :)
ReplyDeleteIts looks amazing and I love how detailed and accurate the tutorial is...I just moved into a new place and the white apartment walls are so blah.SO I'm definitely happy that i found this..heading to Hobby Lobby now :)!!! thank you
ReplyDeleteAmazing! I want to do it today!
ReplyDeleteI won't tell you that they aren't kick @ss because they certainly are!! You did a FABULOUS job! You don't give yourself enough credit because you are more talented than you think!
ReplyDelete