Pages

Thursday, February 28, 2013

Fresh Beat Band Birthday Party


So, you could say my daughter is obsessed with the Fresh Beat Band.  She really really loved them - but after we took her to their concert over in Tulsa back in May it really kicked into high gear.

I knew that doing a Fresh Beat Band party was the only way to go this year for her birthday.  The third birthday is the year you stop having the party for yourself (the parents) and start having for the kids.  So Joe and I bit the bullet and just decided to have a bunch of kids over, turn on some music, and just let them tear up the place and dance!

When I was googling for ideas for the party they were thin and far between so I documented where everything came from to help out other moms.  And......you also get a sneak peek at the new curtains in the den!  Enjoy.

This child has never gotten dressed so fast in the morning.  This is her eating breakfast in full Fresh Beat attire.


I made the little "What a Great day" labels in Microsoft Word - then printed and glued to the party favor bags for the kids. 


Backstage passes are available at the Nick Jr. website to print for FREE here.  I took them to Office Depot to print and then they laminated them for me as well.  I ordered the multicolored lanyards from Oriental Trading and then included the passes in the mail with the invitations:


Invitations are from Etsy shop - FreshBeatBandHQ.  I royally messed up though - all four of the pink sayings are each band members saying....the last one was suppose to be Twist's "wouldn't it be cool if", but when I paraphrased in my notes and then sent it to the designer like that.  Don't make the same mistake I did!  I didn't notice it until after I sent out invites.


The awesome Happy Birthday hanging sign came from Etsy shop - PutYourHeartInIt. It looks twice as good in person. Loved working with this Etsy store.


I made the Groovy Smoothie sign in Microsoft Word and then took it to FedEx/Kinkos and had it printed on cardstock.  The Groovy Smoothie consisted of orange juice mixed with orange soda - the kids loved it.
 The cupcake toppers were another Nick Jr freebie.  I just cut them out and attached them to cake pop sticks.  My mom is responsible for the the drum stand.  She bought a regular drum at Big Lots and then embellished it with ribbon and foam cutouts.


All the tableware came from Oriental Trading


The poster and flyers all came from Nick Jr.com for free.  And I made the welcome sign in Microsoft Word. We also put up the posters and flyers all over the house.


Joe, myself, and the other adults that helped out all wore "SECURITY" shirts.  Joe manned the door and stamped all the kids hands as they came in. 

Our itinerary was let everybody get there, play some FBB music, hit the table and have some Chick Fil A lunch (Brandy and Erik had food already on the table for the kids which helped out a TON), then we did cupcakes and cookies, then handed out the gift bags which included inflatable guitars, sunglasses, microphones and some little stuff, and then we played more FBB music and ended the party with some outside play time.  The rest of the pics aren't too informative.  Just fun!


My fav pic from the entire party.  Totally captured the moment.
 
 
Joe clowning around with one of E's gifts after the party

Wednesday, February 27, 2013

The Greatest Invention Since the DVR

I found it my friends!  I found something that cost $12 and changed my life.  Here it is......


Right?! I know.

So some of you totally get it - and some are like "yea, a cut off cami...big deal."  Yes, it IS a big deal. And this is why....

For those of you who don't know me personally, I have boobs.  Big boobs.  34 DD boobs - and I didn't have to contribute to the GDP to get them -  just good ole genetics from my grandmothers.  When I was pregnant with Evelyn they were up to my chin - you think I'm kidding but I, for once, am not exaggerating. 

Because of the boobs, a lot of V necks shirts and dresses that most other people can wear normally, I have to wear a cami under so that I'm not inappropriately dressed.  There's nothing worse than having that extra cami fabric under your (example) dress roll up around your middle and look all bunchy and make you uncomfortable. 

I had been looking for something like the above and came across a bra from Soma (my fav undergarments place) that had a panel of fabric across the cups that serves the same purpose.  I hated to drop $45 on a bra that I couldn't wear everyday though.  And then a few doors down in a little boutique I found this.  I figure I'd give it a try for $12 and I love it.  It's seamless and has elastic around the bottom so it doesn't ride up and eliminates the bunchy fabric that rides up problem completely.  It's made of the same material as my camis I wear under stuff from The Limited (which are horrible roller-uppers). 

Comfortable elastic band around the bottom
 
So I could buy more of them here. But you know me - instead I'm converting my old camis into this same concept bra top!
 
Step One:  Cut the old cami's excess fabric off using the new Ah-mahzing bra top as a guide. I left an extra inch on the cami's so I can fold it up and place the elastic inside. 


Step Two:  Sew in elastic.  Start by sewing it directly onto the side of the cami. Make sure to start sewing the elastic about 1/8th-1/4th from the edge of the fabric.  (I used Dritz' 3/4th Inch Non-Roll Knit elastic bought at Joann.) 


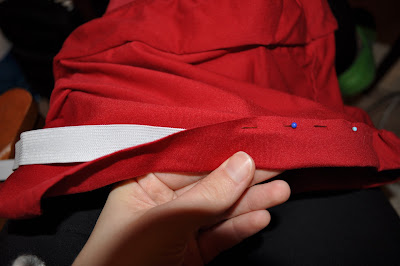
After that, fold up the elastic encased in fabric and pin it on the outside of the elastic band.  The idea is to encase the elastic completely and make a tube.  You don't want to sew directly on the elastic or it won't stretch. 
 
 
Leave about an inch unsewn at the end, and sew the "tube" all the way around.  When you finish - Put it on and pull the excess elastic to a comfortable "tautness" and pin it so it won't move as you take it off.  Then you trim the elastic, reposition and pin the elastic in the fabric, sew the rest of the tube, make a 90 degree turn and sew the elastic to the fabric.  Here is your finished product!
 
 
That took about 15 minutes and saved me $12.  Worth it! 

LinkWithin

Related Posts Plugin for WordPress, Blogger...