

Remember the post where I said the crotch of my only semi-fitting pair of jeans had torn during one of my worst days ever a few weeks ago? Well, in the spirit of my simplicity cleanse, I kept wearing them thinking I could take my time searching for a new perfect pair of jeans. That lasted only another two days until the rip spread and it become obscene for me to continue wearing them. So off to the mall I went to try on jeans and feel fatter than ever. Ugh.
First stop - Gap
One of my old and reliable favorites are the Long and Lean offered here. So I tried some on. Still looking good, and they size their stuff big which made me feel like a million bucks. Then the salesperson brought me the Curvy fit, and it fit perfectly too! And the fabric was super soft and stretchy and I could sit down in it and it was comfortable and it wasn't cutting into me at the waist. Impressive. But, even though the price was right I decided I needed to shop around a bit more since the Gap isn't going anywhere.
Second stop - Banana Republic
I have a pair of jeans from Banana that were a post-pregnancy-tide-me-over-until-I-can-fit-in-my-regular-jeans-again buy. I like them. I only like them because they are the type that grow on you during the day and by the end of the day I can just slip them off without unbuttoning or unzipping them. But, I was lured into Banana that day with the sale sign of "Take an Additional 50% off Already Marked Down Merchandise". Damn you Banana, you've got my number.
They had exactly 2 pairs of jeans. One was a trouser style and one was a flare style. I put on the flare first. Whoa Momma...and I thought the ones at Gap were comfortable. The denim was so thin and stretchy and soft and wonderful that I looked at the price tag on the spot; marked down to $64.99 - that means with the 50% off plus tax....$35! Sold. Tried on the trouser - also super cute and comfy (but not as comfy as the flare) and they were kinda dressy and I need jeans that are more for wollaring around on the couch and floor all day.
Third stop - Masons
For those of you not residing in Northwest Arkansas, Masons is an upscale trendy clothing store that carries expensive jeans; the $150-$300 type jeans. These are the type of jeans I use to wear back when I had a job (aka could afford them). But since my birthday is in a few weeks, I asked for jeans as the gift from my parents and thought I might find the perfect fitting cost covered jean there.
Sidenote: My Dallas shopping spot for jeans was The Blue Jean Bar at Snyder Plaza.
This will be short, I tried on the largest size (a 32) in pretty much every jean they had and they either looked horrible or didn't fit. Now I know I have a hard body to fit - but I currently wear 30's and 31's in other brands (ex: Joe's Jeans, James Jeans). So this time, it's not just me - it's the idiot designers that for some reason think making the consumer feel like crap by making their sizes smaller will sell more jeans? And people keep buying them? This is what is wrong with the world today people.
So I head home perfectly happy with my size 10 jeans from Banana. Well, almost perfectly happy. I failed to mention earlier that the jeans were too long; most jeans are too long on me as I'm long waisted and have squatty legs. In my past, the upscale trendy jean shops offer a service to the squatty such as me by offering to send your jeans out to get hemmed for the cost of anywhere from $8-$16. This is so super frustrating as you just spent 2 weeks worth of grocery money and now have to spend more as well as wait another week so they can go be hemmed! UGH!!!! (Shout out to places like Gap that offer different length jeans like Ankle, Regular and Long/Tall).
Well, I'm a bit of a rebel so I think to myself "I have a sewing machine and I'm pretty handy with it, why don't I just hem these bad boys myself". So I did. And I'm going to tell you how to do it too. Before diving in I didn't know how long it would take (30 minutes), but after I thought it out, it was soooo easy. So not worth even an $8 send out hem job.
The way I'm going to hem the jeans will keep the original hem intact. I'm going to give lots of pics and lots of direction....and away we go!
First, you gotta decide what length you want the jeans to be. Since I don't work anymore or have much of a nightlife, I put on the jeans with flats since that's what I wear 9 times out of 10. I hemmed them a little long for flats in case I wear my cowboy boots or wedges with them. I just tucked the bottoms under and stuck some straight pens in to mark the length I want.

After I pinned, I took my handy dandy little gauge and discovered I want to take 2 inches off the length. So I measured at multiple points all the way around the bottom of the pant leg and pinned off the 2 inch mark.


We will be making 2 cuts around the bottom of each pant leg and we are about to do our first. So take up your scissors and cut all the way around the pant leg in as straight a line as you can from 1/4th to 1/2th an inch above the current hem stitching.


Now it's time to make our other cut. Now cut all the way around the pant leg right along the pin line.

You can toss the center piece of loose fabric and remove the pins from the jeans. Now we are going to repin the original cuff to the jeans.
Turn the loose piece of fabric inside out, and then place it on the outside of the pant leg. Make sure the seams line up correct on the sides. Use straight pins to affix the loose fabric. Pin as close to the cuff as possible.


What we are going to do is sew all the around the entire pant leg right up next to the cuff. After sewing, we will flip the cuff down. Here is a pic that can help you check yourself; this is what mine looked like after I pinned the cuff to the pant leg and flipped it down.

Double check to make sure you have extra pins around the side seams so they line up perfectly for sewing.
Now it's time to sew! Most sewing machines are equipped for pant legs such as this. On my machine (it's a Brother) I had to remove a piece off the end to be able to do this a little easier.
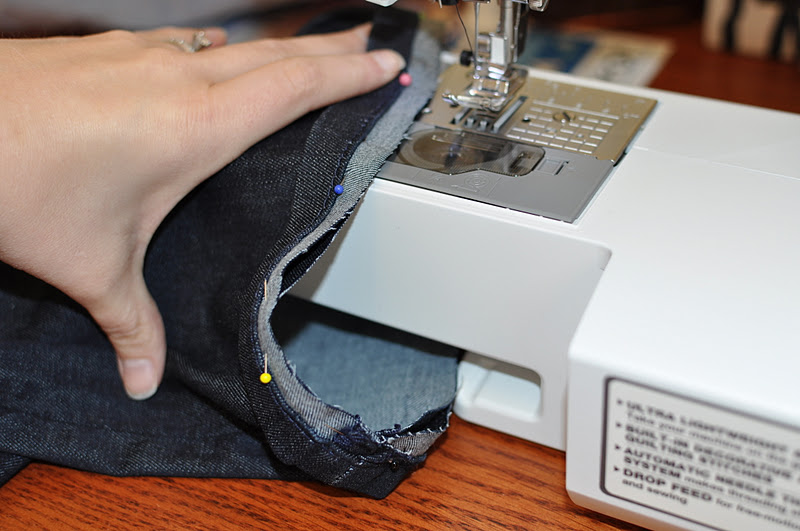
When you drop the foot and place the needle, make it as close to the cuff as possible. I had to pop on my glasses to sew it and I sewed very very slowly to ensure I got right up next to the cuff.

Just take your time, and soon you'll be done. If the cuff starts to get away from you while you're sewing - no worries, just go back and resew the sections you need to. Here's what it looked like when I was done.


I then opened up the hem and hit it with the iron so it would be sure to lay flat once I popped on the jeans.


And here's a pic of it compared to the other (untouched) leg of the jeans.

Looks just as good as what I was paying other people money for! Even if your hem isn't perfectly straight, how many people that close to the bottom of your jeans to look at it? No one will ever notice the difference. And here it is being modeled by moi.

0 comments:
Post a Comment