We left off yesterday with getting the dust guard and the original cording removed from the seats. So the seat should be naked.
Naked seat
Let's get your fabric laid out with the pretty side facing down and then place the seat on top of the fabric with the pretty side down. Now depending on the fabric, you might need to move the seat around a little bit and play with the placement. With my fabric, I'm trying to get maximum birdiness on the seats. The problem with that is my fabric is 54 inches wide, and I really need 27 inches width for each seat, so I don't have a lot of wiggle room on width if I want to try to save some money and get 2 seats done per 3/4ths a yard (which I do because I'm broke). So, I played around a little bit and wrapped the seat and then would take a look to decide on placement. Note: If it applies to your fabric, make sure the fabric is going in the right direction.
Wrapping the seat to make sure I approve of the layout of the fabric.
Now we are ready to commit and start stapling. Let's talk about supplies. I have an Arrow brand T50 electric stapler. I would highly recommend using an electric stapler for a project like this because it's going to go so much faster with it. I looked at The Home Depot online and a brand new T50 will run about $60. You will also need to purchase staples for the project. I bought Arrow brand T50 specific staples in 3/8ths an inch. This length is perfect for the job - not too long so they are sticking up out of the wood. Make sure to buy the chiseled tip staples. It makes the job a lot easier.
Arrow T50 stapler
Staples I used (Wookie wanted to be in the photo shoot)
Note the chiseled tips. The staples go in much easier that the flat tipped ones.
First thing I did when I was stapling all 10 of my dining room chairs was put a staple square in the middle on the front of the seat to hold the fabric in place. Then I wrap the fabric over the back of the seat and place a staple in the middle of the back of the seat to make sure the fabric doesn't move around while I'm stapling around the seat. Since I'm dealing with multiple yards of fabric, I would wrap, staple, and then cut the fabric into a square to work with.
When you pull the fabric before you staple, pull it taut, but not too tightly or else when you are done you will have some rippling of the fabric. Also don't pull to loose or it will bubble. If any rippling or bubbling occurs, it's okay! I had some on a few seats when I was done (and you really won't be able to tell until you flip it over after completion), and to fix it all I did was pull some of the staples out around the bubbling/rippling and restaple to give it a smoother look.
When I staple I use a method: smooth and Pull the fabric, Place the stapler, and put Pressure on the top of the stapler to get the staple in as far as possible.
Smoothing the fabric from the top to bottom
Pulling the fabric around the front of the seat
Placing the stapler down firmly on the fabric to hold it in place
while I move my hand to the top of the stapler
My left hand on the top of the stapler. My right hand (when not taking a photo)
will be around the handle to pull the trigger.
So PPP and get your first staple done. I then move over on either side of the first staple about 3 inches out and put in another staple and then staple in between with 2 or 3 more staples. You are going to use a lot of staples so that the fabric lays the best way possible.
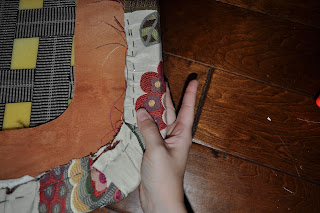
Something else to note before you really get going on stapling is that more likely than not, your seats are not a perfect square and they probably have corners. Therefore, you will have to do something which I call the Pinch and Fold.
As you can see, the front of the seat is curvy, so I have to pinch and fold some of the fabric where I'm stapling so it will lay as smooth as possible on the top of the seat. So put your hand on the pretty side of the seat and smooth it towards where you staple so you can be sure it lays flat on the part that will be seen then you just pinch the fabric (pictured below) and then fold to whichever side you think the fabric lays better and staple.
As you near the corners your Pinch and Folds will increase in number and in size.
Come back tomorrow for Part 3 which is how to make cording (if you want to add it) and finish up our seats!
Click here for Part 1.
Go to Part 3.


0 comments:
Post a Comment