Pages

Monday, October 31, 2011

Using Books as Shelves

The first time I saw this idea was by Karl on this past season of HGTV's Design Star.  Within the past month I saw it in one of my magazines too and now I'm trying to find somewhere in my house to do this.  This is a great DIY and a great way to recycle good reads.  Instead of sticking books on shelves, make them the shelves!!

Karl used L brackets and instead of using a piece of wood as a shelf, he just inserted a book!  My only critique is that I would have built the unit to where the spines of the books would show as the shelves instead.


This is the first time I've seen it done this way (the books hung vertically).  Love.
Source:  inhabit.com


GOLD STAR:  You can purchase books ready to hang at Little Fish Furniture's link below.  Browse through their library of titles!  I much prefer their hidden bracket approach for the hanging which gives it the floating shelf effect.


OMG - Container Store sells brackets specifically for this! Made by Umbra, the price is right at $9.99 for the smaller (holds up to 15 lbs) and $12.99 for the larger. I would go for the smaller so you don't have to stack as many books to cover up the bracket.


Source:  Busyboo


Source:  HolyCool.net


Wednesday, October 26, 2011

Painting Technique to Get Perfect Lines

New challenge with the new house:  Instead of wood frames around the doorways from room-to-room, the new house has drywalled archways.  I didn't really notice or think about how difficult that makes painting the new house until I realized I had to figure out how to tape off the rooms and had to come up with a way to get a clean line.  Fastforward a month and many frustrating tries later, I think I've got this figured out.

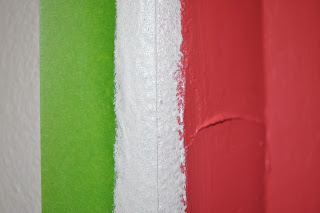
If you don't know me, you don't know how OCD I am.  I originally taped off my dining room using Scotch Blue Painter's Tape (FAIL), and cut in to the tape and had a decently crisp line but there were a couple of spots that bled.  That made me cringe everytime I looked at it so I decided there just had to be a better way.  So a month later (this week) I started to paint the entryway which flows into the dining room via the arches. So I paint the entryway (I taped off the arches but it didn't matter b/c the blue tape made it bleed all over anyway), and then decide to "touch up" the archways.  What I did was then went back and taped over the newly painted area.  Then painted the entryway color on top of the dining room color and tape on the dining room side.  Thus creating a seal of sorts on the tape.  After that dried I went back and painted the dining room color back over it and VOILA!  An amazingly crisp line!

Before Pics:  Darned Blue Tape!


Tape it off, then paint over it with the opposite side's color (taupe). 
After it dries, paint the red over it. 


 After you paint the red, remove the tape and WOW!  Look at that crisp line. 


I know what you are thinking...."But Beth, (example) my entryway was painted years ago and I no longer have that paint color to "seal" the tape with."  Guys and Gals, I got you.  Seal the tape with a clear glaze instead! Then just paint over it!

I also did this method on the molding in the entryway.  I first sealed the tape with the paint used on the woodwork and then I painted my new color over it. 


Blue Vs. Green Painter's Tape


After painting multiple rooms around the house, I'm gonna have to give the "W" to the green tape AKA Frogtape.  It really does work better at keeping the paint from bleeding as well as doesn't pull the paint off my molding I taped.  It's about $2 more than the Scotch tape, but I've converted and I think it's worth it. 

To see a project I did that compares actual pictures using both tape types, click here

Entryway Bench

Sorry for my no posts on Monday and Tuesday.  I've been fighting a sinus infection battle from the couch, but now I'm back in business and knocking out tons of little things around the house. This week is going to be filled with a lot of mini posts since I'm doing lots of small projects. 

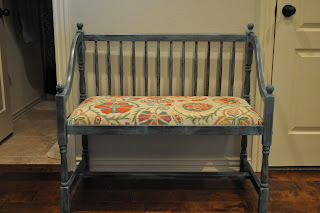
I bought some beautiful fabric at Sew Chic in Rogers (sadly they are going out of business but I got the fabric for 50% off :) ) to use to recover my entryway bench.  I wanted to pop the neutral entryway with turquoise and orange accents and this was just too perfect.  I love this fabric so much I'm thinking of recovering things and adding pillows with it in about 3 other rooms of the house.  I did some before and after pics below. Hope you enjoy!

Before:  A drab brownish material.

After: Bright and Cheery


 I feel like the fabric change really lightened up the space. 

For directions on how to recover a bench seat, see here


Friday, October 21, 2011

Obsession of the Day: Greek Key Patterns

Greece.  The country that brought us western civilization, philosophy, the Olympics, and moussaka.  All of these are gifts that keep on giving, but there is one more - greek key patterns.  It would be redundant to say I love it, BUT I love it in moderation.  A whole room of greek key pattern would make one dizzy.  So now I will introduce you to a phrase my love, Joe, and I use....."Just a touch".  "Honey, would you like more wine?"  "Sure, but just a touch".  "Readers, do you want greek key pattern in your house?"  Correct response:  "Just a touch".  Excellent.

It's so versatile, it can be used on anything (as you will see in the pics below).  I think the new living room will include some greek key canvas art on the wall somewhere. So as promised in this post, here is some insight into my greek key obsession.  Don't miss the DIY project at the end.


Thornton Designs via Decor Pad

Photo from Modernhaus


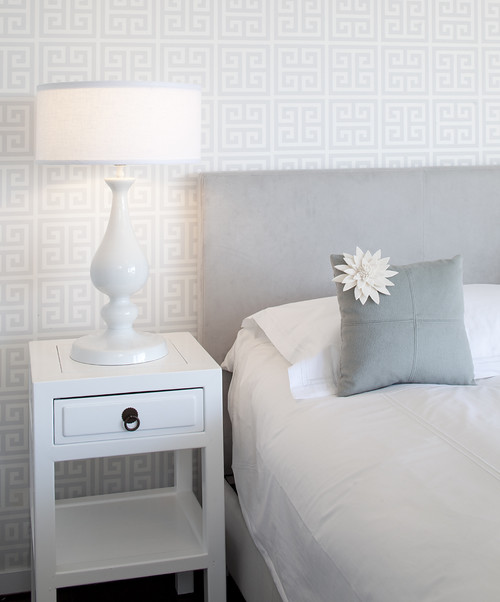
I love this wallpaper.  It's so subtle, but allows the room to be Wow!
without having to add color to do so.
Tineke triggs contemporary bedroom


Seeing this makes me want to have another baby


Tangerine! I'm loving the shape of the headboard, but check out the nightstands - I want them!  You can buy this one - click on the link.
Jill Sorensen via Live.Like.You


Westchester Residence at Kwinter Designs


VT Interiors via Dream. Design. Live


Ancient? Yes.  Out of style?  No! 

Here is a little DIY project.  I saw this in the May 2010 edition of Southern Living magazine.  They took a $15 mirror and turned it into this!  It's just lovely - and easy to do.  Instructions are here

Photo from Southern Living

Thursday, October 20, 2011

Carvable Pumpkins - Another One of Life's Great Inventions

Let's all take a minute to reflect upon what a novel idea a carvable pumpkin is.  This invention allows us to carve a pumpkin, without the mess, and keep it over the years.  This is SOOO rewarding since we spend a lot of time cleaning out and carving a pumpkin, and usually it just rots and you have to throw it away and you are left with nothing but the memory of its beauty; or a picture.

In case you haven't seen these marvels, I have seen them at both Hobby Lobby and Michael's.  Last year Michael's sold out before I could complete my list of to-dos with them.  I will say that the Michael's I purchased them at (shameless plug for the one on Greenville Ave. near Lovers in Dallas), did a great job of displaying lots of possibilities of what you can do with them.  They usually come in white, orange, black, or glittery, but the best part - you can paint them if you want a different color!  I've seen them painted green and made into Frankenstein, the black ones made into bats or spiders, just use your imagination and the possibilities are endless!

Here is a pumpkin I did for display on the countertop. 


I stole this idea from a magazine which I would totally site except I can't remember which one I saw it in.  I think it's Better Homes and Gardens from October 2010 because I flipped my Woman's Day from last October and it wasn't in there (Yes, I keep all my magazines). I saw it in that mag and that day went to Michael's and bought this pumpkin to replicate.  I do rebuy the mini-pumpkins each year though.  I wouldn't imagine they would keep so well in my storage bins.

This, though, is by far one of my favorite creations ever!


A pumpkin spider!  It's ironic because I'm deathly afraid of spiders; making him was cathartic in a way.  I bought a black pumpkin, carved his cute little face and then used chenille pipe cleaners for the legs.  Super easy and I get tons of compliments since he always hangs on our front stoop.


Halloween is by far my favorite holiday.  I love dressing up and love candy!  With the move I haven't been able to bust out my full array of decorum as usual, but next year we'll go full out!  Send me ideas!!


Wednesday, October 19, 2011

DIY: Recycle Your Corks and Wine Bottles

Don't throw away your old wine bottles and corks!  Recycle them into something new to be used or displayed. 

This post was inspired after drinking a truly horrible bottle of wine over the weekend.  I partially blame myself for not chilling it first, but it was so bad that my friends and I cut it with ginger ale and it was STILL awful.  After choking some of it down I said "The only thing this bottle is good for is I get to put the cork on display".  Hence, today's post.   

Here is a pic of a wine bottle by my kitchen sink.  I just added a spout and keep my dish detergent in it.  This way I have it convenient for use and it's not an eyesore to keep out on the counter!


Or you can soak off the labels and turn them into planters:

Source:  Design Sponge


Or use a glass cutter to cut them down and stick a candle in them to be a candle holder, or cut them down to cover tea lights:


Don't forget that bottles come in all colors so you could collect different sizes and shapes of blue glass bottles for display.  You could paint the bottles and/or dip them in glitter or anything you want for your own special purpose!  Spray painting would be easiest.

Another random idea I just had.  Get different furniture knobs and glue them into the tops of the bottles.  Put them back on your wine rack for a fun display. 

Here's some more great ideas for bottles:


Source:  Taste of Home


Perfect for the season
Souce:  Nap Time Crafts blog


Mix wine with twine!
Source:  Crave/Create blog

On to the Corks....

Do a cork collection!  I've been collecting corks for about a year now and have filled a vase on one of my shelves with them.  I have some friends that have a wide-mouthed basket on their coffee table they keep theirs in for display as well. 


Bonus:  Instead of stacking just books for display, try old cigar boxes.  I got the ones pictured here at a flea market for just $4!


Now that this vase is full, I'm going to start collecting to do some art projects with my leftovers.  There is so much to do with them!  You can paint them, you could soak them in water with some food coloring and they'll absorb the color so that they are tinted.  You can glue them to cardboard, mdf or wood and make your own corkboard.  Here are some cute cork ideas:


Source:  Etsy.com via 4 Eyes and Ears' shop


Source:  I Can Find the Time blog


I love that they used a glaze or poly to make these shiny
Source:  Project Rowhouse blog


Love the scale, frame and placement of this board
Source:  Marsh-Madness blog


Source:  Crafty Nest


So many things you could do!  Best part is - you get to drink wine to get these great projects started. *wink.  Until next time...


Tuesday, October 18, 2011

DIY: Repurposed Corkboard

Greetings!  I'm starting to get a great running list of DIY ideas for posts!  Let me know if you want me to try anything out for ya!

So, I've been dealing with this oversized corkboard of my husband's for years.  It's moved to three different houses and two cities with us over the years and we've never actually used it.  It's 24X36 inches which isn't that big in the scheme of things, but it's just too big for a corkboard where we needed it.  Well, now that we are moved into the new house I needed something for the laundry room for coupons, and Joe really wanted the corkboard up by the desk (I'm not sure why).  So as I stared at it Sunday morning, I made the decision to saw it in half, dress them up, and make into two more manageable corkboards and then we'd have one for each space!

I checked at Hobby Lobby today and they have multiple sizes of corkboard there, so you might be able to just skip over the steps regarding sawing the board in half.  Rule:  Never buy ANYTHING at Hobby Lobby unless it's on sale.  You can check the weekly flyers online.  At least once each month every item will go on sale. 

Joe was soundly sleeping until I started the project.  This included me going in and out the back door twenty times while gathering supplies which in turn sounded the door chime for our house alarm twenty times.  Since we have a keypad in the bedroom, Joe woke up.  Let me mention that after he griped about being woken up and I went outside and began using the saw - that did not wake the man up!  I had both dogs howling and Evelyn crying when I used it, but Joe slept like a baby.  Sorry that triple door chime is so disturbing. 

Anyway, on to the project.  Pretty simple stuff.  I believe in all of you and know you can do it!  No fear!

Here is a pic of the corkboard before:


In case you have eagle eyes and spotted the picture in the middle of my husband, his cousins, and Shaq (as in Shaquille O'Neal).  Congratulations! You get gold stars.  If you have eyesight like me, I included the original pic below:

Sidenote:  My husband is 6'1".  Shaq is GI-NORMOUS.

Back to the project.  I measured the board and decided to just half it.  So I drew a line down the middle of the back of the board to help guide the saw as I cut.  I don't plan on using the frame, so after I cut it in half I'm going to discard it.


I cut the board outside so I wouldn't get dust in the house, and since I don't have any saw horses I just weighed down one side of the board while I let it overhang to cut.


This is the jigsaw I used.  I checked Home Depot, and they have a comprable one for $33.

Got the board cut in half

Now it's time to bust out the fabric.  I picked a black and cream graphic print.  Lesson learned early on in the project - lay your fabric on the diagonal.  I did not do this.  I should have.  Since fabric has stretch to it, there is no way you are going to get it to lay perfectly in line with the lines of the corkboard. 

I used my new best friend, spray adhesive, to get the fabric to stay in place while I stapled it to the board.  


Spray On Adhesive
 
Fabric

Stapled it to the board.  I used the same size staples, 3/8ths an inch, I did in the post here


Staple all the way around and voila!

A beautiful new corkboard to display!
 

Oh, but that's not all!  Let's jazz it up with some nail head trim!  I drew a line on the fabric with chalk about an inch and a half in from the side and just pushed in the nail head trim pieces one by one. 


Warning:  The nail heads will poke out the back of the board.  I took a cardboard box and cut it down to size and just hot glued it to the back of the board so the nails wouldn't scratch up the wall behind it.  I then added a hanging kit and was done!

Finished product!  Turned out just the way I wanted it to.  It's gonna look great about my soon-to-be BM Labrador Blue walls. 

Now I have a place to keep all my coupons instead of them just laying on the counter where they became part of the "out of sight, out of mind" principle.  Now, as I'm running out the back door to run errands I can look to see if I need to take anything with me.  Yay!


LinkWithin

Related Posts Plugin for WordPress, Blogger...